How To Card And How To Prevent Your Self From Rippers
WIKIPEDIA EXPATIATION FOR CARDING.
Carding is a term describing the trafficking of credit card, bank account and other personal information online as well as related fraud services.
“carding” is process related to fraud, usually credit cards .
At this time every shopping site or other purchase in site using credit card,
which get attention from hackers and they noticed this point and start using it for their benefit.
Gearbest promotion
Meaning of Rippers In Carding?
I think you must see some posts from some Facebook user on Facebook or whatsapp group, according to them they are carders,some claim can card for you in some advance payment usually 50% of product that you want to card, in some cases they want cc from you.
But when you deal them in inbox (ib) ,they just take money from you and disappear in as they get their money simply they block you. In simple words Facebook full fill with 90% of rippers.
So its really important to understand carding and how to prevent your self from rippers.
the purpose of this article is not about ripping in carding, it is about how to card, so let's focus again on carding,
before we then begin with the main topic we will need some basic requirements.
Basic Requirements In Carding
1. Computer, Mac book, Laptop : Don’t be foolish you can’t card with your simple mobile phone, so it’s time to run your pc/lappi in work.Don't worry if your stuff's are not working high level program, it is same as you play game on your pc .
2. VPN: A virtual private network (VPN) extends a private network across a public network, such as the Internet. It enables a computer to send and receive data across shared or public networks as if it was directly connected to the private network, while benefiting from the functionality, security and management policies of the private network. This is done by establishing a virtual point-to-point connection through the use of dedicated connections, encryption, or a combination of the two.
There are a lot of free and premium VPN are available, it is recommended to use premium or may be it is a trial software.You can get a lot of free vpn software on internet, or trial VPN Here is link where you can get VPN software for free or premium ones http://www.start-vpn.com/tag/free-trial/
3. RPD - Remote Desktop Protocol (RDP): is a proprietary protocol developed by Microsoft,
which provides a user with a graphical interface to connect to another computer over a network connection.The user employs RDP client software for this purpose, while the other computer must run RDP server software.Clients exist for most versions of Microsoft Windows (including Windows Mobile), Linux, Unix, Mac OS X, iOS, Android, and other modern operating systems.
RDP servers are built into Windows operating systems; an RDP server for Linux also exists. By default, the server listens on TCP port 3389. Microsoft currently refers to their official RDP server software as Remote Desktop Services, formerly "Terminal Services". Their official client software is currently referred to as Remote Desktop Connection, formerly "Terminal Services Client" You can connect to RPD by clicking on start menu - remote desktop connection - then type victims ip address. Example 74.7.42.89,click connect, now it will pop up screen asking for password and username which is in this case: User name: Shipping Password shipping. Now click OK, and you will get access to Remote Desktop Connection - which means you are connected to someone computer and you will buy stuff from victims computer. Not YOURS!
4. Socks 5: Socks 5 Socket Secure (SOCKS) is an Internet protocol that routes network packets between a client and server through a proxy server. SOCKS 5 additionally provides authentication so only authorized users may access a server. Practically, a SOCKS server proxies TCP connections
to an arbitrary IP address, and provides a means for UDP packets to be forwarded. SOCKS performs at Layer 5 of the OSI model (
the layer, an intermediate layer between the presentation layer and the transport layer).You can get socks for free ,or you can buy fresh which i recommend
Before we proceed lets learn how to user socks 5 in Mozilla Firefox.
How To Use Socks 5 In Carding?
Example of socks 4/socks 5 are 75.119.127.189:36871
Socks 5 are very easy to use via Mozilla Firefox. First open Mozilla Firefox.
Just follow this step in Firefox -
1. go to options » advanced » network »connections » settings.
2.Now the screen will pop up various options like :
1.No proxy; 2.Auto Detect; 3.Use system proxy; 4. Manual proxy configuration.
4. Manual proxy configuration. Now type in socks host IP you have collected from above mention sites. for example Socks Host: 75.119.127.189 Port: 1080.
3. Now press OK and you are connected to secure socks 5. I will explain more when we start carding.
5. Credit card: Victims credit card, you can get a lot of free credit cards here on ABH ,
or you can buy one from various cvv shops that can be find on internet.
Let's see how CC will look like or what information CC contain Example of victims credit card (see the below information):
First Name : Ben
Middle Name : Jamsin
Last Name : Parker
Spouse Name :
Father Name :
Billing Address : 9006 peppertree circle
City : wichita
State : KS
Zip Code : 67226
Country : US
Phone Number : 3166342050
Credit Card Information :
_____________
Card Type : Credit
Credit Card Number : 5102 4129 0001 1332
Exp. Date : 6/June / 2012
Name On Card : H. James Menehan
Cvv2 : 474
Mother Maiden Name : penny
Social Security Number : 515 16 4160
Birth Day : 28
Birth Month : 02
Birth Year : 1926
Account Information :
_____________
AOL ID : hjimdoc@aol.com
Password : Jm6227mh
This is just only an example of victims credit card, you don't need all this information in carding like.
Some sites ask only for card numbers, exp date and cvv2.
Here you can buy a cc (some domain may be blocked by your browser or antivirus)
https://ccbox.su/Login.php
bstab.net
buyst0re.bz
c2v2.net
carderpro.com
cardersbay.in
cardrockcafe.cc
cardsmarket.su
cardstorm.ru
ccbase.biz
ccbases.com
ccbases.net
ccbases.su
ccchecker.ru
ccdumb.cc
n1shop.su
nonvbv.com
CARDING WEBSITE
Now that you have all this above, let’s start carding
Let’s say we want free phone like Samsung S6, IPHONE 6, etc...
First of all choose a online shopping website from your country of target. Why?
Because if you choose shopping site from another country, either they will not be able to make delivery in your country
or they take up to 2 days for delivery. I hope you don’t want to wait a lot for your order. I leave this choice for you.
When you choose your site, find out which type of it is.
There are two types of shops, VBV and NON VBV:
VBV is a Verified by Visa, an online security system for credit card transactions. Which means you need to provide a card knowing a lot of victim credit card information such as DOB (date of birth), SSN (social security numbers), Secure password witch cc owner use for online purchase. You can check on shop is there a VBV VERIFIED BY VISA ICON on home page. NON VBV is not verified by visa card, you can buy anything with non vbv cards without going through 3d verification process.
I leave it now for later.
__________________________
CARDING TUTORIAL
1. Connect to your vpn software and choose ip address of your victim's country.
2. Connect to RPD ( Remote Desktop connection), must be same country (IP), state as credit card holder's address .
3. Now from your RPD, connect to socks 5 via Mozilla Firefox, example 97.77.96.226 34539 United States, Must be same as your victim's address: COUNTRY, STATE, CITY!
4. When you done all that, create email with same name as credit card holder name, same address, same city, and everything. Or if you got email access that's would be a lot better.
5. Go to your website shop you want to card.
6. Register with credit card holder information, name, country, city, address, and email you made one just for this ORDER.
7. Add a shipping address, some sites don't alLeveloflevels:
low to ship to different address but there is plenty of shops which do.Shipping address is where package will be delivered usually Carder called it Drop .
Which means you provide your address, girlfriend address, friend address, to your drop etc.
8. Select product you want, and click on check out, now it will ask for you know, how you will pay. Choose credit card, and type victims credit card numbers and other information needed.
9. Click order now, and i am sure 100% they will confirm your order via email or you will get track your order on website, after pressing order.
(note that some sites need phone verification, but you can always buy phone number in internet or in real life , confirm your order, and destroy it after they ship your item)
10. Wait for order to arrive to your shipping address, I personally use . When they arrive they call me, and i can say different address where i want to pick up my order.
Hope you all know now what carding, ripping is, how to get CC and how to card? Please share this article with your friends..
2017年12月12日星期二
2017年12月10日星期日
V2Ray 简单安装
debian-8.7-x86_64
root@server1:~# sudo vi /etc/hosts //修改hosts,改成“127.0.0.1 自己的主机命”。注意编辑的时候ESC,然后才能上下左右。i进入编辑模式。
root@server1:~# apt-get update
root@server1:~# apt-get install sudo //以上两步更新 sudo程序
root@server1:~# sudo vi /etc/hosts //修改hosts,改成“127.0.0.1 自己的主机命”。注意编辑的时候ESC,然后才能上下左右。
root@server1:~# wget https://toutyrater.github.io/install-release.sh //下载安装包
root@server1:~# sudo bash install-release.sh //安装脚本。会自动生成端口和ID。安装成功:V2Ray v3.1 is installed.
root@server1:~# sudo systemctl start v2ray //启动
root@server1:~# sudo systemctl restart v2ray //重启
root@server1:~# service v2ray status //查看运行状态
编辑配置文件,
{ "log": { "access": "/var/log/v2ray/access.log", "error": "/var/log/v2ray/error.log", "loglevel": "warning" }, "inbound": { "port": 00000, "protocol": "vmess", "settings": { "clients": [{ "id": "xxxxxxxxxxxxx", "level": 1, "alterId": 64 }] } }, "streamSettings": { "network": "kcp", //开启MKUP "kcpSettings": { "mtu": 1350, "tti": 20, "uplinkCapacity": 5, "downlinkCapacity": 100, "congestion": false, "readBufferSize": 1, "writeBufferSize": 1, "header": { "type": "none" } } }, "outbound": { "protocol": "freedom", "settings": {} }, "inboundDetour": [{ "protocol": "shadowsocks", //添加SS。可添加多个。 "port": 0000, "settings": { "method": "aes-128-cfb", "password": "v2ray", "udp": true } }], "outboundDetour": [{ "protocol": "blackhole", "settings": { }, "tag": "blocked" }], "routing": { "strategy": "rules", "settings": { "rules": [{ "type": "field", "ip": [ "0.0.0.0/8", "10.0.0.0/8", "100.64.0.0/10", "127.0.0.0/8", "169.254.0.0/16", "172.16.0.0/12", "192.0.0.0/24", "192.0.2.0/24", "192.168.0.0/16", "198.18.0.0/15", "198.51.100.0/24", "203.0.113.0/24", "::1/128", "fc00::/7", "fe80::/10" ], "outboundTag": "blocked" }] } } }
root@server1:~# sudo vi /etc/hosts //修改hosts,改成“127.0.0.1 自己的主机命”。注意编辑的时候ESC,然后才能上下左右。i进入编辑模式。
root@server1:~# apt-get update
root@server1:~# apt-get install sudo //以上两步更新 sudo程序
root@server1:~# sudo vi /etc/hosts //修改hosts,改成“127.0.0.1 自己的主机命”。注意编辑的时候ESC,然后才能上下左右。
root@server1:~# wget https://toutyrater.github.io/install-release.sh //下载安装包
root@server1:~# sudo bash install-release.sh //安装脚本。会自动生成端口和ID。安装成功:V2Ray v3.1 is installed.
root@server1:~# sudo systemctl start v2ray //启动
root@server1:~# sudo systemctl restart v2ray //重启
root@server1:~# service v2ray status //查看运行状态
编辑配置文件,
vi /etc/v2ray/config.json 开启MKCP,添加SS,以下为完整配置文件:{ "log": { "access": "/var/log/v2ray/access.log", "error": "/var/log/v2ray/error.log", "loglevel": "warning" }, "inbound": { "port": 00000, "protocol": "vmess", "settings": { "clients": [{ "id": "xxxxxxxxxxxxx", "level": 1, "alterId": 64 }] } }, "streamSettings": { "network": "kcp", //开启MKUP "kcpSettings": { "mtu": 1350, "tti": 20, "uplinkCapacity": 5, "downlinkCapacity": 100, "congestion": false, "readBufferSize": 1, "writeBufferSize": 1, "header": { "type": "none" } } }, "outbound": { "protocol": "freedom", "settings": {} }, "inboundDetour": [{ "protocol": "shadowsocks", //添加SS。可添加多个。 "port": 0000, "settings": { "method": "aes-128-cfb", "password": "v2ray", "udp": true } }], "outboundDetour": [{ "protocol": "blackhole", "settings": { }, "tag": "blocked" }], "routing": { "strategy": "rules", "settings": { "rules": [{ "type": "field", "ip": [ "0.0.0.0/8", "10.0.0.0/8", "100.64.0.0/10", "127.0.0.0/8", "169.254.0.0/16", "172.16.0.0/12", "192.0.0.0/24", "192.0.2.0/24", "192.168.0.0/16", "198.18.0.0/15", "198.51.100.0/24", "203.0.113.0/24", "::1/128", "fc00::/7", "fe80::/10" ], "outboundTag": "blocked" }] } } }
参考:https://toutyrater.github.io/prep/install.html
http://www.jianshu.com/p/b59150fd8f47
http://www.jianshu.com/p/b59150fd8f47
2017年11月10日星期五
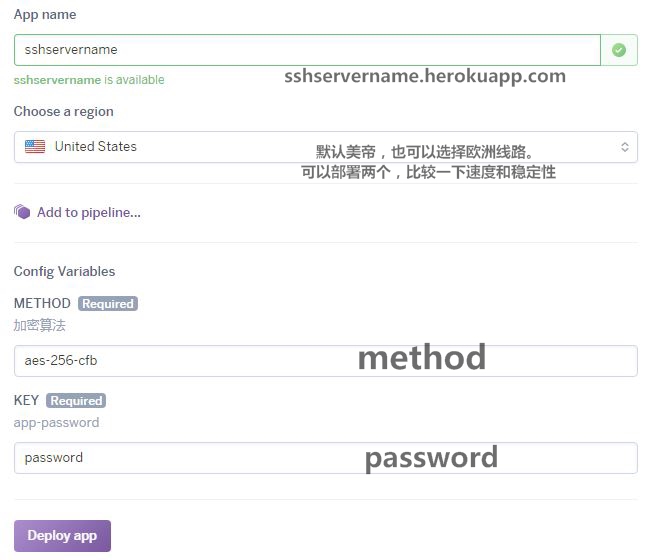
转载:一键部署,随处可用 Free Shadowsocks-Heroku
shadowsocks-heroku
Heroku 是一个支持多种编程语言的云平台即服务,shadowsocks-heroku 则是可部署在 Heroku 平台的 ss 服务。 和 shadowsocks 不同的是 shadowsocks-heroku 使用的 WebSocket 代替原本的 sockets。
准备
1. 注册 Heroku 帐号
Heroku 提供免费账号,部分介绍如下:
- 512 MB RAM per dyno
- Free apps sleep automatically after 30 mins of inactivity to conserve your dyno hours
- Free apps wake automatically when a web request is received
- https://devcenter.heroku.com/articles/limits
- https://devcenter.heroku.com/articles/free-dyno-hours#usage
部署
- 点击
,一键部署到heroku
也可以选择另一个版本的服务端shadowsocks-websocket-python - 设置 加密算法和app 密码

启动本地 Client
- 下载release https://github.com/onplus/shadowsocks-heroku/releases (备份)下载SS-H即可。
- 修改config.json参数,服务器就是“你的APP名称.herokuapp.com”,密码是前面自己设置的。然后运行ss-h.exe 或 start.vbs (或 win托盘工具taskbar.exe)
- 启动成功,命令行显示:
server listening at { address: '127.0.0.1', family: 'IPv4', port: 1080 }
配置代理
- 安装:打开浏览器的扩展程序页面
chrome://extensions,把SwitchyOmega.crx文件拖放到浏览器扩展程序页面安装 - 配置:添加SwitchyOmega代理服务器
    代理协议: SOCKS5
    代理服务器local_address:127.0.0.1
    代理端口local_port: 1080
可选:
- 使用无污染DNS https://www.zhihu.com/question/32229915
- cow/meow智能代理 https://github.com/cyfdecyf/cow#cow-climb-over-the-wall-proxy
#rc配置文件
listen = http://127.0.0.1:7777
proxy = socks5://127.0.0.1:1080
2017年11月1日星期三
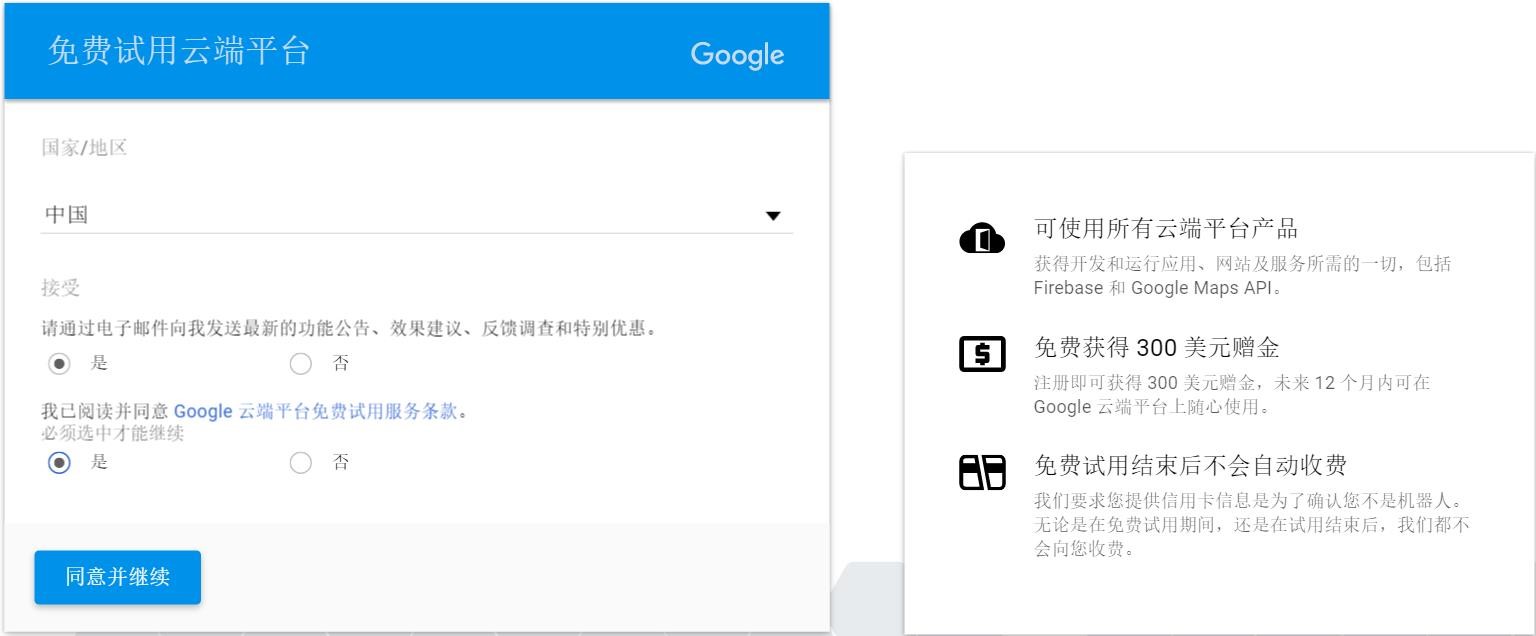
转载:Google Cloud Platform 免费搭shadowsocks一年
Google cloud platform这两天特别火,因为从免费60天改成1年了(300刀)。我也试一把,看看价格,速度如何。
必须有:
必须有:
- 能访问google的网络,这是个悖论啊
- google账号
- visa,万事达等支付美元的信用卡,会有1美元的交易,但不会生效
访问https://cloud.google.com, 登录后填写资料,都是中文,没什么好说的,内容写拼音就好,美国地址随便搜一个了。
之前就有很多人写了步骤,可以参考这里:
https://github.com/kaiye/kaiye.github.com/issues/9
http://51.ruyo.net/p/2144.html
接着创建一个项目,我发现以前gae里的项目都移到这里了。
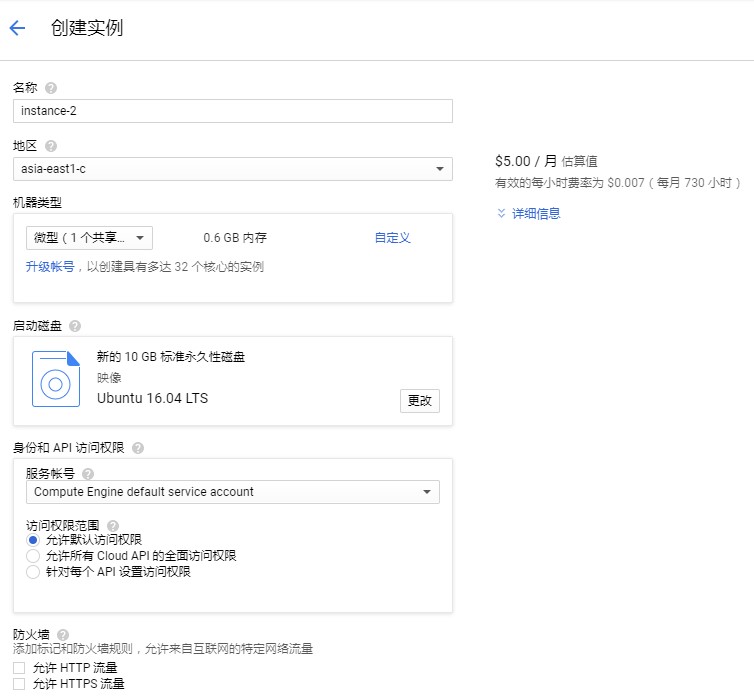
点击菜单 产品与服务->计算引擎->VM实例->创建实例
名称随便写。
服务器很多建议亚洲的,其实我觉得美国的也不错,毕竟有时候需要美国ip。
CPU内存存储根据自己需要吧,我选了最便宜的套餐,就是想知道一年能用多少钱,如果合适以后就用这个了。
系统我选的centos 7.
创建后很快就完成了。点击ssh旁边的下拉箭头,选择从浏览器打开。这个支持复制粘贴,很方便。
开始安装了,在ssh里输入:
之前就有很多人写了步骤,可以参考这里:
https://github.com/kaiye/kaiye.github.com/issues/9
http://51.ruyo.net/p/2144.html
接着创建一个项目,我发现以前gae里的项目都移到这里了。
点击菜单 产品与服务->计算引擎->VM实例->创建实例
名称随便写。
服务器很多建议亚洲的,其实我觉得美国的也不错,毕竟有时候需要美国ip。
CPU内存存储根据自己需要吧,我选了最便宜的套餐,就是想知道一年能用多少钱,如果合适以后就用这个了。
系统我选的centos 7.
创建后很快就完成了。点击ssh旁边的下拉箭头,选择从浏览器打开。这个支持复制粘贴,很方便。
开始安装了,在ssh里输入:
sudo -i
因为权限问题,所以命令都得加
sudo,或者通过sudo -i直接到root账户。yum updateyum -y install wget
- wget –no-check-certificate -O shadowsocks-all.sh https://raw.githubusercontent.com/teddysun/shadowsocks_install/master/shadowsocks-all.sh
- chmod +x shadowsocks-all.sh
- ./shadowsocks-all.sh 2>&1 | tee shadowsocks-all.log
然后要选择安装ss版本,端口号,密码等。
最后出现下面这个就算完成了:
最后出现下面这个就算完成了:
- Congratulations, ShadowsocksR server install completed!
- Your Server IP : 1.2.3.4
- Your Server Port : 4433
- Your Password : 123456789
- Your Encryption Method: aes-256-cfb (默认,我改了chacha20没法用)
- Protocol : origin
- obfs : plain
- If you want to change protocol & obfs, please visit reference URL:
- https://github.com/breakwa11/shadowsocks-rss/wiki/Server-Setup
- Welcome to visit: https://teddysun.com/486.html
- Enjoy it!
如果要修改ss配置文件,最好不要修改加密方式 :
我安装的ShadowsocksR 版,其他的版本见秋水网站里的说明:
我安装的ShadowsocksR 版,其他的版本见秋水网站里的说明:
sudo vim /etc/shadowsocks-r/config.json
输入i到编辑模式,通过方向键移动光标,修改后按ESC键退出编辑,输入 :wq保存退出。如果直接退出则输入 :q.
修改后要重启才有效。回到ssh,输入
修改后要重启才有效。回到ssh,输入
reboot。
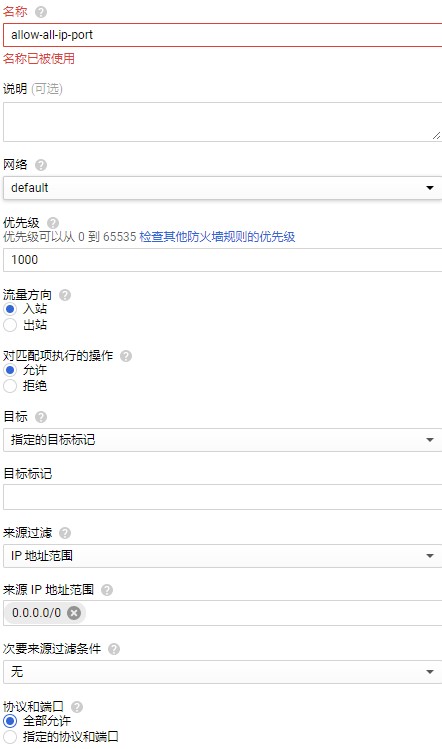
还有两点需要注意,必须修改:
- 防火墙
产品与服务->网络->防火墙规则->创建防火墙规则
来源过滤要选允许任意来源的流量。(点击下拉菜单如果用鼠标无法选择时可以用键盘上下方向键+回车,我不知道这是什么问题。)
允许协议和端口填tcp:1-65535; udp:1-65535 - 静态IP
同样是在网络里->外部IP地址->保留静态IP
重启后再进入ssh,我安装的是ssr,所以启动命令如下:
sudo /etc/init.d/shadowsocks-r start
加入自动重启shadowsocks(以下可以省略了):
sudo vim /etc/rc.local
输入e,进入文件,接着输入i开始编辑,在空白处添加以下代码,这是ssr的启动代码,根据安装版本修改:
- sleep 10
- /usr/bin/ssserver /etc/init.d/shadowsocks-r start
-
- exit 0
同样,ESC键后输入 :wq,保存退出。
reboot。看看ssr有没有自动启动。
和我的搬瓦工对比了YouTube速度,是搬瓦工的2-3倍。搬瓦工价格20刀一年。看看google一年花多少钱吧。
转载:用Google Cloud Platform搭建Shadowsocks服务教程
经过一天的努力和摸索,终于完成了 Shadowsocks 的搭建并优化提速,遗憾的是没有找到突破 netflix 封锁的办法,希望大神指点迷津。
以下内容分四步
一、Google Cloud Platform虚拟机部署
二、升级VPS内核开启BBR
三、搭建Shadowsocks server
四、设置Shadowsocks server开机启动
一、Google Cloud Platform虚拟机部署
二、升级VPS内核开启BBR
三、搭建Shadowsocks server
四、设置Shadowsocks server开机启动
一、Google Cloud Platform虚拟机部署
1.申请试用GCP
谷歌云平台可让您构建和主机应用程序和网站,存储数据,并分析对谷歌的可扩展基础架构的数据。
申请地址:请点击
申请地址:请点击
登陆你的谷歌账户,必须使用信用卡,而且不能使用虚拟卡,招商银行、中信银行的全币种卡、浦发银行的 VISA 卡均可以通过验证。理论上 VISA 卡均可获得通过,由于我绑过美区的 Google Wallet 所以我选的是美国,选择中国后绑定信用卡会填写个人信息可以如实填写信用卡账单地址,添加信用卡和购物网站一样,不赘述。成功后会于扣款1刀,验证卡片后会返还。
GCD 现在免费赠送300刀期限是一年,也就是300刀和一年时间谁先用完就以谁为准,结束之后你不点继续使用时不会扣费的。
GCD 现在免费赠送300刀期限是一年,也就是300刀和一年时间谁先用完就以谁为准,结束之后你不点继续使用时不会扣费的。
2.修改防火墙
这一步很多教程是最后再设置,但是我选择提前设置,这样后面部署好SS服务就可以直接使用了。
直接访问:请点击
或者在菜单中依次点击 【网络】 –> 【防火墙规则】 –> 【创建防火墙规则】
如图选择相关项目。
如图选择相关项目。
设置按照上图来设置,名称自己取,IP 地址范围:
保存后会生成规则,请耐心等待。
0.0.0.0/0保存后会生成规则,请耐心等待。
3.获取静态IP(注:不获取也行)
这一步很重要,只有有了静态IP,你后面部署的SS服务才能用。
直接访问 请点击
直接访问 请点击
或者在菜单中依次点击 【网络】–> 【外部 IP 地址】 –> 【保留静态 IP】
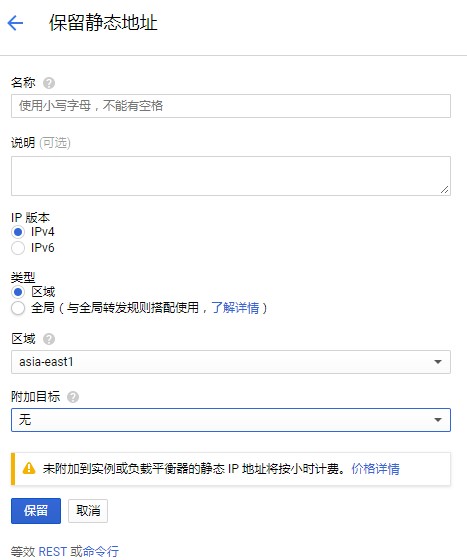
名称自定义即可
PS:静态 IP 只能申请一个!!!
大陆速度最佳的机房是台湾彰化的机房了,asia-east1-c对大陆最友好
还有东京亚洲东区,也就是东京机房了asia-northeast1-a
PS:静态 IP 只能申请一个!!!
大陆速度最佳的机房是台湾彰化的机房了,asia-east1-c对大陆最友好
还有东京亚洲东区,也就是东京机房了asia-northeast1-a
4.创建计算引擎
直接访问 : 请点击
或者在菜单中依次点击 【计算引擎】–> 【创建实例】
或者在菜单中依次点击 【计算引擎】–> 【创建实例】
机器类型里面选最便宜的那个微型就够用,启动磁盘选Ubuntu16.04LTS,其他系统也可以只要是你会部署的,我只能参照其他教程搞定Ubuntu1604所以我选择这个
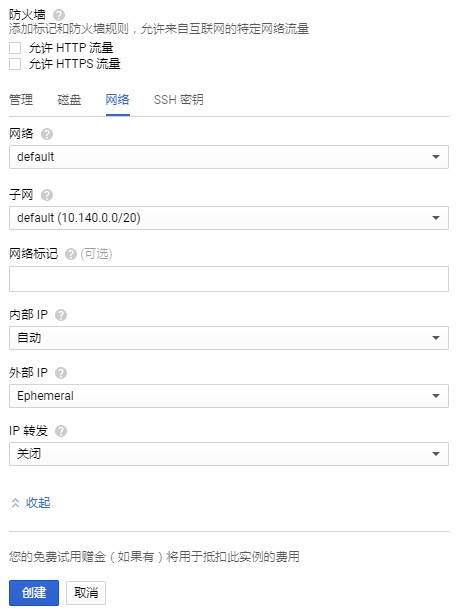
这里内部ip选择你刚刚得到的那个静态IP,这样虚拟机就完成了设置
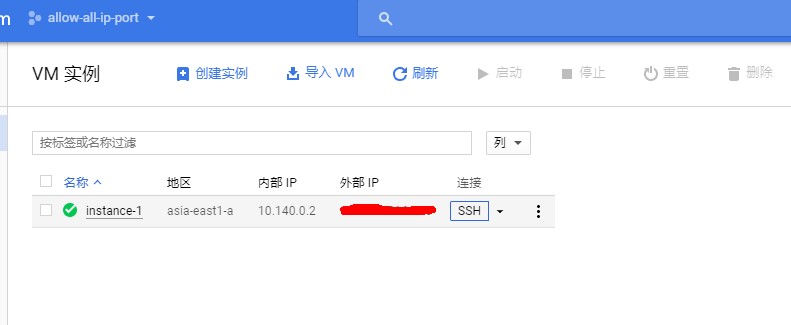
Google Cloud 自带的浏览器 SSH 挺好用的,推荐使用!另外如果你是chrome浏览器的话推荐SSH for Google Cloud Platform 这个插件给你,chrome内扩展程序安装地址是:
点击上图的ssh后就直接弹出来
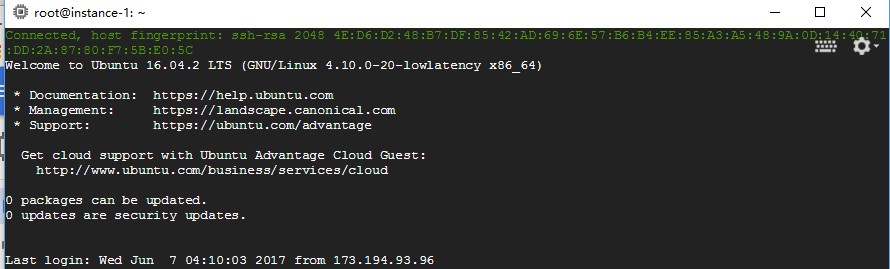
至此,第一部分GCD上的准备工作和部署全部完成,
二、升级vps内核开启BBR
由于众所周知的原因,单纯部署完shadowsocks服务之后速度都不会太理想,即使你选择的是台湾、日本这种很好的线路,依然会存在丢包和不稳定的情况。因为这一步会需要重新启动,所以放在部署SS服务之前。
这下面的东西我都不懂,扒自这个教程 你照着一步一步来绝对没问题。
BBR 目的是要尽量跑满带宽, 并且尽量不要有排队的情况, 效果并不比速锐差。
Linux kernel 4.9+ 已支持 tcp_bbr 下面简单讲述基于 KVM 架构 VPS 如何开启。
准备工作
进入ssh后不是root权限,先获取root权限
sudo –i
更新系统(两行命令分开执行,第二步等待时间较长,会出现####和进度百分百,耐心等)
apt update
apt upgrade
查看当前内核版本
uname –a
然后你会发现发现版本低于 4.9
安装新内核
安装新内核
apt install linux-image-4.10.0-20
卸载旧内核
apt autoremove
启用新内核
update-grub
重启
Reboot
验证内核版本
uname –r
看到如下类似如下回显,版本号为4.10.0-20-generic
启用BBR
写入配置
echo "net.core.default_qdisc=fq" >> /etc/sysctl.conf

echo "net.ipv4.tcp_congestion_control=bbr" >> /etc/sysctl.conf
配置生效
sysctl -p
检验
lsmod | grep bbr
看到回显
不需要重新启动,我们接下来直接开始在虚拟机部署SS
tcp_bbr 20480 0说明已经成功开启 BBR不需要重新启动,我们接下来直接开始在虚拟机部署SS
三、搭建Shadowsocks server
首先更新一下 apt-get 软件包
sudo apt-get update
然后通过 apt-get 安装 python-pip
sudo apt-get install python-pip
完成之后使用 pip 安装 shadowsocks 服务
sudo pip install shadowsocks

说明安装成功
然后我们需要创建一个 shadowsocks server 的配置文件,可以直接建在当前用户目录下
sudo vim /etc/ss-conf.json
回车之后会进入这个创建的文件,按键盘上的 insert键会进入编辑,然后把下面的内容输入进去。按ESC键会发现左下角的insert消失,shift+:这个组合键左下角出现:输入wq回车就保存退出文件。红色字体分边是端口和密码,设置成你想要的就行了
{
“server”:”0.0.0.0”,
“server_port”:8838,
“local_address”:”127.0.0.1”,
“local_port”:1080,
“password”:”123456”,
“timeout”:600,
“method”:”aes-256-cfb”
}
7.31日更新:上面的内容有网友反映直接复制会报错,请注意以下两点:1代码的全部内容必须为英文半角输入,2server_port与password后面的数字内容请自定义,也就是你之后在shadowsocks客户端上配置使用的端口和密码。
最后用这个配置文件启动 shadowsocks 服务
sudo ssserver -c /etc/ss-conf.json -d start
但是服务器可能会自动重启,这样的话就需要每次手动开启SS服务,很麻烦而且还会遇到要用梯子但是梯子在墙外的这种困境,怎么办呢?那么我们进入第四步,写脚本让系统开机后自动启动ss服务。
四、设置Shadowsocks server开机启动
这一点让我尝试了很久,搜了很多教程说什么在系统的rc.local里面添加启动命令就行等等,试过很多次,各种折腾改路径都不行,最后还是参考这个教程把ss的配置文件修改成自己的,就成功了。
创建脚本 /etc/init.d/shadowsocks
sudo vim /etc/init.d/shadowsocks
进入文件后添加以下内容,方法与前面创建ss-conf.json这个文件一样,使用insert键、shif+:、wq回车保存等等
#!/bin/shstart(){
ssserver -c /etc/shadowsocks.json -d start
}
stop(){
ssserver -c /etc/shadowsocks.json -d stop
}
case “$1” in
start)
start
;;
stop)
stop
;;
reload)
stop
start
;;
*)
echo “Usage: $0 {start|reload|stop}”
exit 1
;;
esac
然后增加这个文件的可执行权限
sudo chmod +x /etc/init.d/shadowsocks
创建文件 /etc/init/shadowsocks.conf
sudo vim /etc/init/shadowsocks.conf
内容直接复制如下
start on (runlevel [2345])stop on (runlevel [016])pre-start script
/etc/init.d/shadowsocks start
end scriptpost-stop script
/etc/init.d/shadowsocks stop
end script
执行
sudo update-rc.d shadowsocks defaults
然后就添加到开机启动中了
最后你可以reboot测试一下看是否成功,若未成功就check一下第四步哪里有问题。
台湾这个线路经过优化之后,测试Youtube1080P是不会卡顿的,能达到你带宽的上限速度。
最后你可以reboot测试一下看是否成功,若未成功就check一下第四步哪里有问题。
台湾这个线路经过优化之后,测试Youtube1080P是不会卡顿的,能达到你带宽的上限速度。
订阅:
评论 (Atom)